Resin Documentationhome company docs
app server 
app server

cluster: dynamic server (elastic cloud) configuration
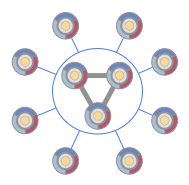
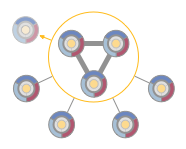
Configuration and deployment of an dynamic-server Resin cluster. Resin's cloud support is an extension of its clustering. It is the third generation of Resin clustering, designed for elastic clusters: adding and removing servers from a live cluster. A triple-redundant hub-and-spoke network is the heart of a Resin cluster. The three servers that form the hub are called the 'triad' and are responsible for reliability and for load-balancing clustered services like caching. All other servers can be added or removed without affecting the shared data. Services like clustered deployment, caching, JMS, and load-balancing recognize the new server and automatically add it to the service. When you delete a server, the services will adapt to the smaller network.  The triad hub-and-spoke model solves several clustering issues we've discovered over the years. The three primary issues are the need for triple redundancy, managing dynamic servers (particularly removing servers), and giving an understandable user model for persistent storage. Triple redundancy is needed because of server maintenance and load-balancing. When you take down a server for scheduled maintenance, the remaining servers have extra load and they are more vulnerable to a server failure. A triple-redundant hub with one server down for maintenance can survive a crash of one of the two remaining servers. The load is less, too. When one server is down for maintenance, the other two servers share an extra 50% load each. With only a backup system, the extra server would double its load. Dynamic servers benefit from the hub-and-spoke model because the 'spoke' servers are not needed for reliability. Because they don't store the primary cache values, the primary application deployment repository, or the queue store, it's possible to add and remove them without affecting the primary system. With other network configurations, removing a server forces a shuffling around backup data to the remaining servers. The triad also gives a simpler user model for understanding where things are stored: data is stored in the triad. Other servers just use the data. Understanding the triad means you can feel confident about removing non-triad servers, and also know that the three triad servers are worth additional reliability attention. The standard /etc/resin.properties configuration lets you configure a triad and dynamic servers without a few properties. To configure three static servers for the triad hub, enable dynamic servers, and select the "app" cluster as the default dynamic server, use something like the following in your /etc/resin.properties. Example: resin.properties for a 3-server hub ... # app-tier Triad servers: app-0 app-1 app-2 app_servers : 192.168.1.10:6800 192.168.1.11:6800 192.168.1.12:6800 ... # Allow elastic nodes to join the cluster (enable for cloud mode) elastic_cloud_enable : true # The cluster that elastic nodes should join - each will contact a Triad server # Use a separate resin.properties file for each cluster home_cluster : app
To start the server, you can use the "start-all" command. The start-all with start all local servers (by comparing the IP to the IP addresses of the current machine.) If no local servers are found, start-all will start a dynamic server using the <home-cluster>. CLI: starting the servers unix> resinctl start-all If you've installed Resin as a Unix service, it will be started automatically when the server starts. You can either use the /etc/init.d resin command or the "service" if it's available. The service start is equivalent to a resinctl "start-all". CLI: service on debian # service resin start If you are creating a custom resin.xml or modifying the default one, you can configure the servers explicitly in the resin.xml. The baseline cloud configuration is like a normal Resin configuration: define the three triad servers in your resin.xml, and copy the resin.xml across all servers. You will attach new servers to the cluster when you start it on the command-line. You can still define more servers in the resin.xml, or fewer if you have a small deployment; it's just the basic resin.xml example that uses three servers. The baseline configuration looks like the following:
You can configure the cluster using resin.properties without needing to modify the resin.xml. For the hub servers, add an IP:port for each static server. For the dynamic servers, enable elastic_cloud_enable and home_cluster. You can also configure the resin.xml directly to add the servers individually. Example: basic resin.xml for a 3-server hub <resin xmlns="http://caucho.com/ns/resin"> ... <home-cluster>my-cluster</home-cluster> ... <cluster id="my-cluster"> <server id="a" address="192.168.1.10" port="6800"/> <server id="b" address="192.168.1.11" port="6800"/> <server id="c" address="192.168.1.12" port="6800"/> The first three <server> tags in a cluster always form the triad. If you have one or two servers, they will still form the hub. One server acts like a Resin standalone; two servers back each other up. More than three <server> tags form static servers acting as spoke servers in the hub-and-spoke model. The static servers are identical to any dynamic servers, but are predefined in the resin.xml The <resin:ElasticCloudService/> enables dynamic servers. For security, Resin's is to disable dynamic servers. You can also add a <home-cluster> which provides a default for the --cluster command-line option. command-line: adding a dynamic serverBefore starting a server, your new machine needs the following to be installed:
Since these three items are the same for each new server, you can make a virtual machine image with these already saved, use the VM image for the new machine and start it. To start a new server, you'll add a '--cluster' option with the name of the cluster you want to join. Example: command-line starting a dynamic server unix> resinctl --elastic-server --cluster my-cluster start If you don't have a <resin-system-auth-key> in the resin.xml, and you do have admin users defined in the AdminAuthenticator, you will also need to pass a -user and -password arguments. The new server will join the cluster by contacting the triad. It will then download any deployed applications or data, and then start serving pages.  The triad will inform cluster services about the load balancer, services like caching, admin, JMS, and load-balancer. Removing a dynamic serverTo remove a dynamic server, just stop the server instance. The triad will keep its place in the topology reserved for another 15 minutes to handle restarts, maintenance and outages. After the 15 minutes expire, the triad will automatically remove the server. Variations: fewer static servers and more serversAlthough the three static server configuration is a useful baseline for understanding Resin's clustering, you can configure fewer or more static servers in the resin.xml. Defining fewer servers than three in the resin.xml is only recommended if you actually have fewer than three servers. Defining more servers than three in the resin.xml depends on your own preference. Having only three servers in the resin.xml means you don't need to change the resin.xml when you add new servers, but listing all servers in the resin.xml makes your servers explicit - you can look in the resin.xml to know exactly what you've configured. It's a site preference. If you have fewer than three servers, you can define only the servers you need in the resin.xml. You won't get the triple redundancy, but you will still get a backup in the two-server case. For elastic configurations, it's possible to use a single static server in the resin.xml, for example if your load was between one and two servers. If your site always has two servers active or three servers, you will want to list them in the resin.xml as static servers, even through Resin would let you get away with one. Listing all the servers in the resin.xml ensures that you can connect to at least one in case of a failure. In other words, it's more reliable. With more static servers than three, you can also add them to the resin.xml. You can also define dynamic servers in the resin.xml if their IP addresses are fixed, because Resin will dynamically adapt to stopped servers. If you use the static/elastic technique, you still need to keep the triad servers up. In other words, you'll adjust load by stopping servers from the end, shutting down server "f" and keeping servers "a", "b", and "c". Cluster deployment works with dynamic servers to ensure each server is running the same application, including the newly spun-up dynamic servers. The new server will ask the triad servers for the most recent application code and deploy it. While it's nice for the convenience (skipping the copy step), it's more important for the extra reliability. Cloud deployments should generally use the cluster command-line (or browser) deployment instead of dropping a .war in the webapps directory because the cluster deployment automatically pushes deployment to new servers. With a cluster command-line deployment, the new server will check with the triad hub for the latest deployment. If there's a new version, the dynamic server will download the updates from the triad hub. The cluster deployment ensures all servers are running the same .war deployment. You don't need external scripts to copy versions to each server; that's taken care of by a core Resin capability. Example: command-line deployment unix> resinctl deploy test.war If you don't have a <resin-system-auth-key> and do have administrator users configured, you will also need to pass the -user and -password parameters. Configuration for cluster deploymentThe basic configuration for cluster deployment is the same as for single-server deployment. Resin uses the same <web-app-deploy> tag to specify where cluster deployment should be expanded. If for some reason you deploy a .war in the webapps directory and deploy one on the clustered command-line, the cluster will take priority. In the following example, a test.war deployed in the command-line will be expanded to the webapps/test/ directory. The example uses <cluster-default> and <host-default> so every cluster and every virtual host can use the webapps deployment. Example: resin.xml cluster deployment
<resin xmlns="http://caucho.com/ns/resin">
...
<cluster-default>
<host-default>

  <web-app-deploy path="webapps"
           expand-preserve-fileset="WEB-INF/work/**"/>

</host-default>
</cluster-default>

<cluster id="app-tier">
  ...
</cluster>
...
</resin>
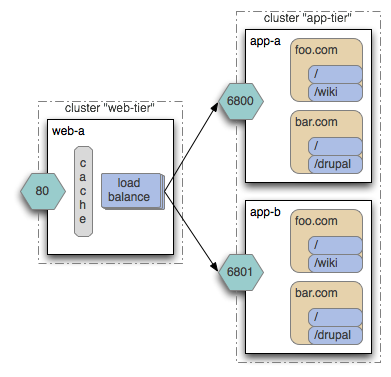
See the load balancer documentation for more information about the load balancer. When the new server starts, it needs to receive the new requests from the load balancer. If you're using Resin's load balancer (or Resin's mod_caucho), the load balancer will send HTTP requests to the new server. The load balancer must be configured in the same resin.xml as the application tier because the app-tier cluster needs to communicate with the load balancer tier. Resin's load balancer is configured in the resin.xml as a web-tier cluster with a URL rewrite rule dispatching to the app-tier cluster. Example: resin.xml for load balancing
<resin xmlns="http://caucho.com/ns/resin"
          xmlns:resin="urn:java:com.caucho.resin">

<cluster id="web-tier">
  <server id="web-a" address="192.168.1.20" port="6800"/>
  <server id="web-b" address="192.168.1.21" port="6800"/>

  <proxy-cache/>

  <host id="">
    <resin:LoadBalance cluster="app-tier"/>
  </host>
</cluster>

<cluster id="app-tier">
  <server id="app-a" address="192.168.1.10" port="6800"/>
  <server id="app-b" address="192.168.1.11" port="6800"/>
  <server id="app-c" address="192.168.1.12" port="6800"/>

  ...
</cluster>

</resin>
With the example configuration, Resin will distribute HTTP requests to all static and dynamic servers in the app-tier. Because the HTTP proxy-cache is enabled, Resin will also cache on the web-tier.  If you're not using Resin's load balancer, your cloud will need some way of informing the load balancer of the new server. Some cloud systems have REST APIs for configuring load balancers. Others might require a direct configuration. Resin's load balancer does not require those extra steps. Resin's cluster-aware resources adapt to the added and removed servers automatically. A new server can participate in the same clustered cache as the cluster, see the same cache values, and update the cache with entries visible to all the servers. The Resin resources that are automatically cache-aware are:
Clustered CachingResin's clustered caching uses the jcache API which can either use a jcache method annotation to cache method results or an explicit Cache object injected CDI or JNDI. By minimizing the configuration and API complexities, Resin makes it straightforward to improve your performance through caching. The jcache method annotation lets you cache a method's results by adding a @CacheResult annotation to a CDI bean (or servlet or EJB.) The following example caches the result of a long computation, keyed by an argument. Because the cache is clustered, all the servers can take advantage of the cached value. Example: method caching with @CacheResult
import javax.cache.CacheResult;

public class MyBean {

  @CacheResult
  public Object doSomething(String arg)
  {
    ...
  }
}
When using cached injection, you'll need to configure a cache instance in the resin-web.xml. Your code and its injection are still standards-based because it's using the CDI and jcache standards. Example: resin-web.xml Cluster cache configuration
<web-app xmlns="http://caucho.com/ns/resin"
            xmlns:resin="urn:java:com.caucho.resin">

  <resin:ClusterCache name="my-cache"/>

</web-app>
The cache can be used with CDI and standard injection: Example: using jcache
package mypkg;

import javax.inject.*;
import javax.cache.*;

public class MyClass {
  @Inject
  private Cache<String,String> _myCache;

  public void doStuff()
  {
    String value = _myCache.get("mykey");
  }
}
|